
A Builder’s Guide to Rock-Solid Support for Decks
The right support for a deck is the absolute non-negotiable first step to building a safe, long-lasting outdoor space. It all starts with a solid foundation plan that accounts for your specific location, soil, and the total weight the structure will have to bear.
Building Your Deck Foundation From The Ground Up
Before a single hole is dug or a board is cut, every successful deck project begins with careful, thoughtful planning. Think of this phase as creating the blueprint for your deck's strength and longevity. I've seen it time and time again—rushing this stage almost always leads to costly mistakes down the line. Taking the time now to properly assess your site and understand the forces at play is essential.
This whole initial process really boils down to three core activities: sizing up your site, calculating the expected load, and making sure everything aligns with local building codes.
This chart breaks down that initial workflow.
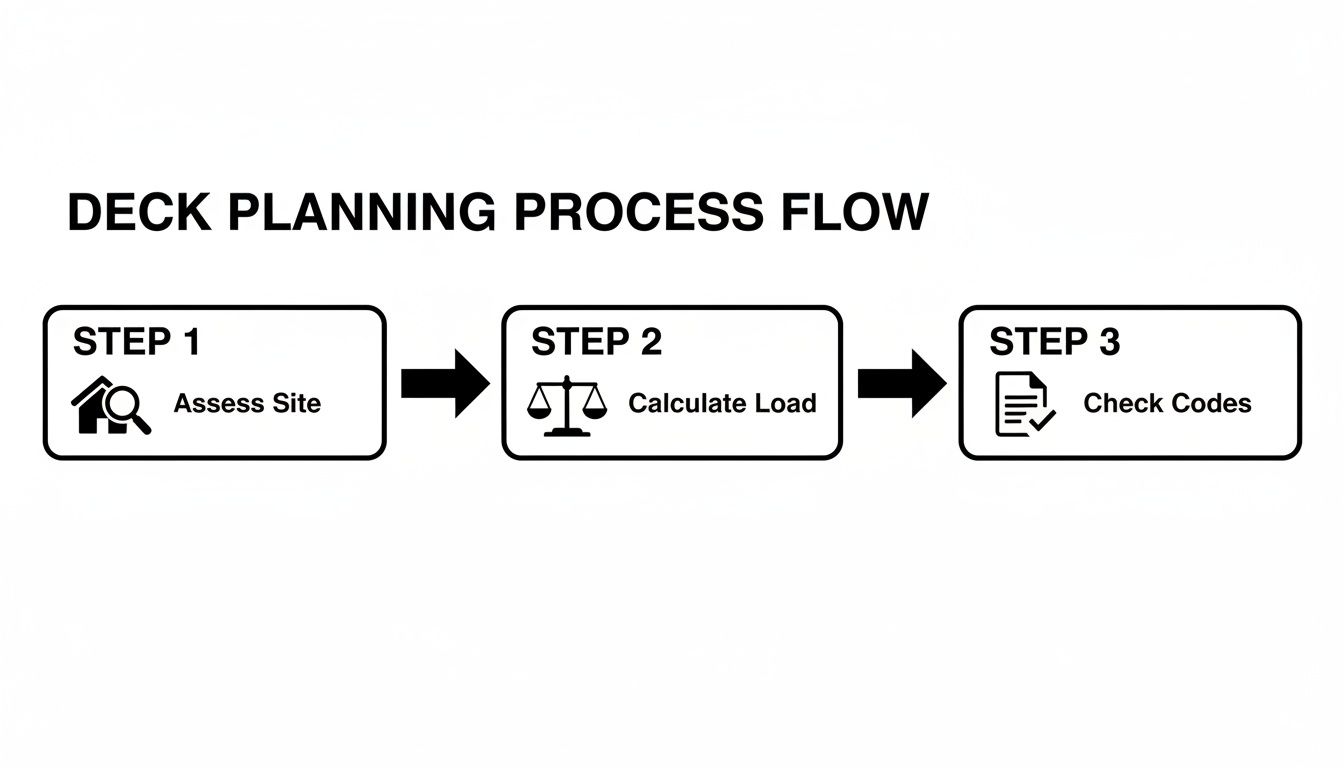
As you can see, these steps build on each other. A thorough site assessment directly informs your load calculations, which are then cross-referenced with your local codes to ensure you're building to spec.
Assessing Your Site and Soil
The ground beneath your deck is just as important as the lumber you build with. Seriously. Start by just watching your yard. Where does water pool after a heavy rain? Poor drainage can lead to soil erosion and will absolutely compromise your footings over time.
Next, get a feel for your soil type. Sandy or gravelly soil is great—it drains well and provides a stable base. Heavy clay soil, on the other hand, can expand and contract with moisture, which can cause your footings to shift over the years. Knowing this helps you figure out the right depth and size for your footings, especially for preventing frost heave in colder climates.
Calculating Deck Loads
Every deck has to support two kinds of weight: the dead load (the weight of the structure itself) and the live load (all the people, furniture, snow, and everything else). Your local building codes will have specific requirements for these calculations, usually measured in pounds per square foot (PSF). Getting the total load right is what dictates the size and spacing of your footings, posts, and beams.
A common mistake is underestimating the live load. You have to plan for the maximum possible weight—think a big family gathering or a heavy snowfall—to make sure your deck supports meet safety standards.
This planning becomes even more critical in regions with unique building challenges. For example, the North American decking market is projected to grow at a 3.98% CAGR through 2031. For our customers at XTREME EDEALS INC. in places like California, this means projects must adhere to strict seismic codes. The clay-heavy soils and seismic activity demand robust hardware like our post base brackets and heavy-duty lag bolts.
Proper hardware, like our multi-packs of deck screws and post base brackets, ensures your structure has the uplift and lateral resistance it needs to last. For a little inspiration on what's possible once your foundation is solid, check out our guide on some must-try winter deck design ideas.
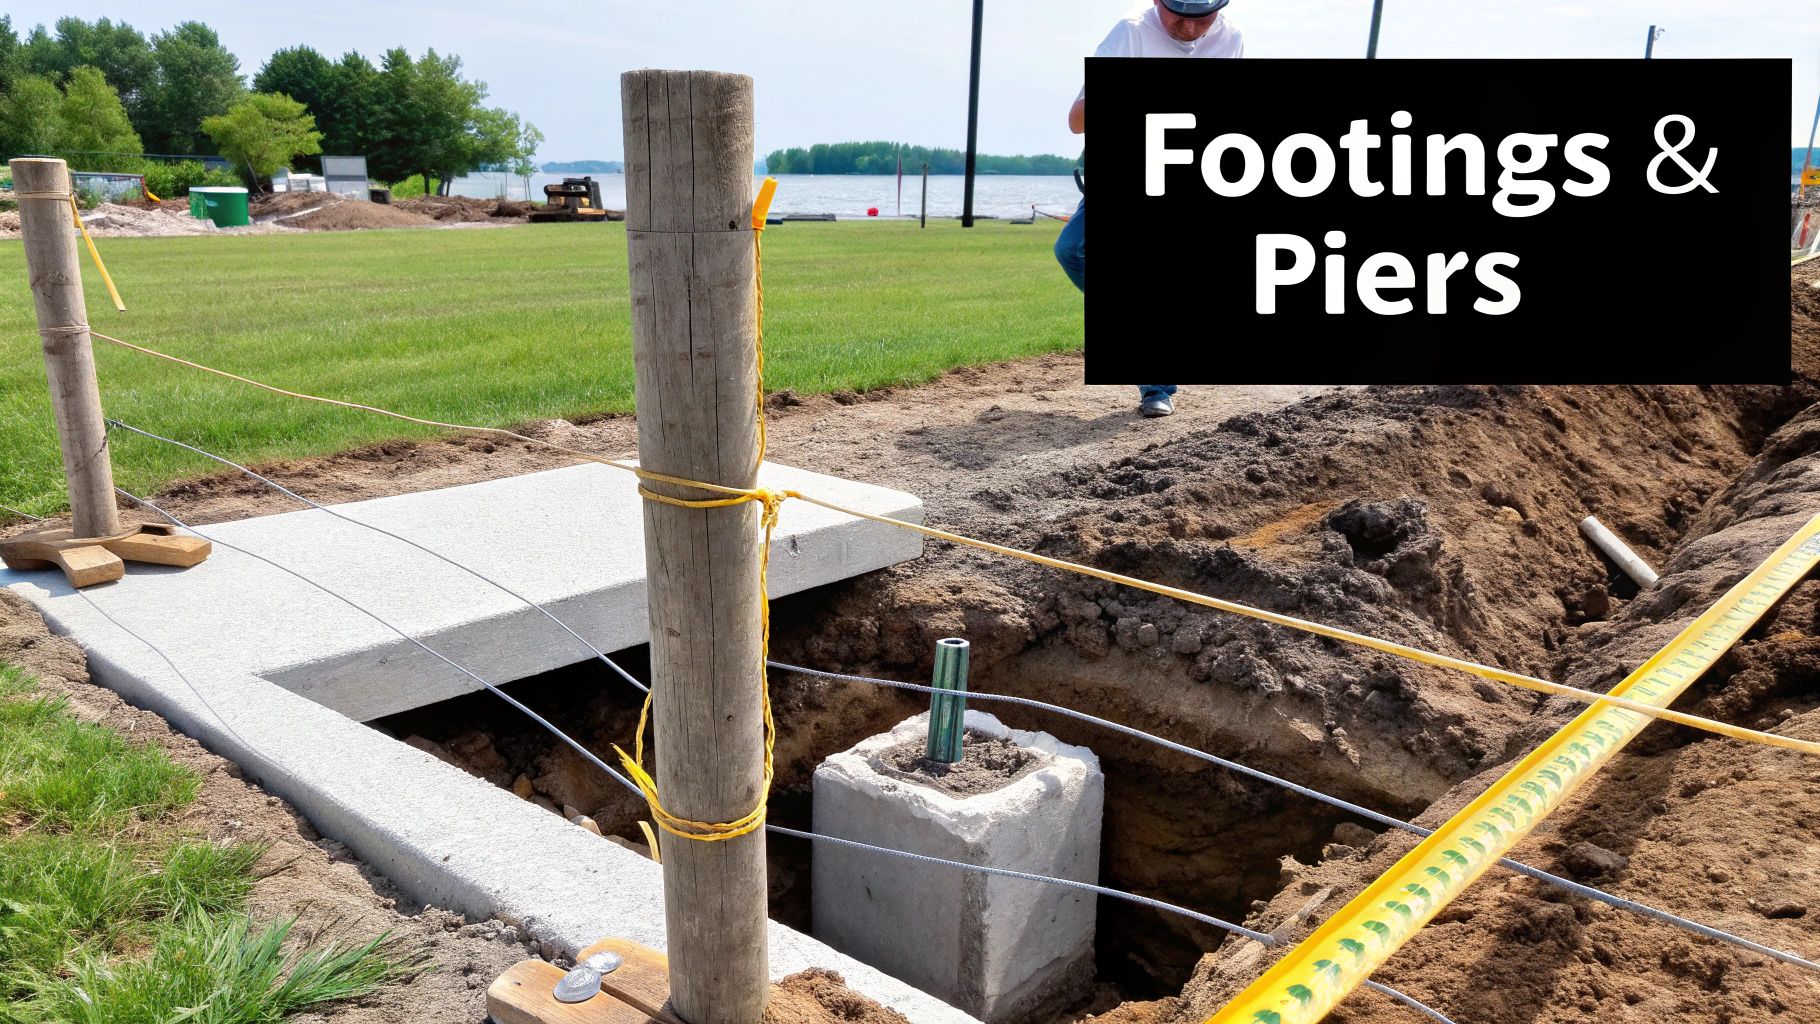
Alright, you've got your site plan sketched out. Now it's time to turn that piece of paper into a rock-solid foundation. The footings are the unsung heroes of your deck; they're what transfer every bit of weight—from the lumber and the grill to every person at your summer barbecue—safely into the ground.
Getting this part right is what makes the difference between a deck that stands the test of time and one that starts to sag and shift after a few seasons.

When it comes to footings, you're usually looking at two main paths: pouring your own concrete footings or using pre-cast concrete piers. There’s no single "best" answer here. The right choice really comes down to your property, your soil, and how much concrete work you're comfortable tackling.
If you're dealing with a sloped yard or funky soil conditions, pouring your own concrete is the way to go. It gives you complete control over the size and depth. On the other hand, for a straightforward, level project, pre-cast piers can be a massive time-saver.
Digging and Pouring Concrete Footings
Going the poured-concrete route starts with digging holes. This isn't just about grabbing a shovel; you need to check your local building code. It will specify exactly how deep you need to go—almost always below the local frost line to stop the ground from heaving your deck up in the winter—and how wide the holes need to be for your deck's calculated load.
A power auger makes this job a lot easier, but good old-fashioned elbow grease with a post-hole digger will get you there too.
Once the holes are dug, you'll slide a cardboard form tube (like a Sonotube) into each one. This is what gives your footing a clean, uniform shape. Mix your concrete following the bag's instructions until it’s about the consistency of thick oatmeal, then start pouring.
Pro Tip: As you fill the forms, grab a spare piece of rebar or a sturdy stick and poke it up and down in the wet concrete. This little step, called vibrating, gets rid of trapped air pockets that can create weak spots. You want a solid, dense footing for maximum strength.
While the concrete is still wet, it's time to set your post anchors. These metal brackets are the critical link between your concrete footing and the wood post. I can't stress this enough: use high-quality, galvanized post bases. A reliable option like the Galvanized Steel Post Bases from XTREME EDEALS INC. is essential. They not only lock the post in place but also hold the wood up just off the concrete, which is key for preventing moisture from wicking up and causing rot.
Alignment here is everything. Stretch string lines between your corner stakes to create a grid. This ensures every single post anchor is perfectly positioned and level before that concrete starts to harden.
Comparison of Deck Footing Options
Deciding between poured footings and pre-cast piers upfront will save you a world of hassle later. This table breaks down the pros and cons to help you figure out what makes the most sense for your build.
| Footing Type | Best For | Installation Difficulty | Typical Cost | Recommended Hardware |
|---|---|---|---|---|
| Poured Concrete | Sloped ground, heavy loads, or when custom sizing is needed. | Moderate to difficult, involves mixing and heavy lifting. | $20 – $40 per footing (materials) | Galvanized Post Base Brackets, J-Bolts |
| Pre-Cast Piers | Flat ground, smaller decks, and for DIYers seeking a faster setup. | Easy to moderate, requires precise hole depth and placement. | $15 – $30 per pier | Adjustable Post Bases, Concrete Screws |
In the end, it doesn't matter if you pour the concrete yourself or set pre-made piers. The mission is the same: create an unshakeable base for your deck. This is where the long-term stability of your entire project begins, so choosing the right hardware from the get-go is non-negotiable for a deck that's safe, secure, and built to last.
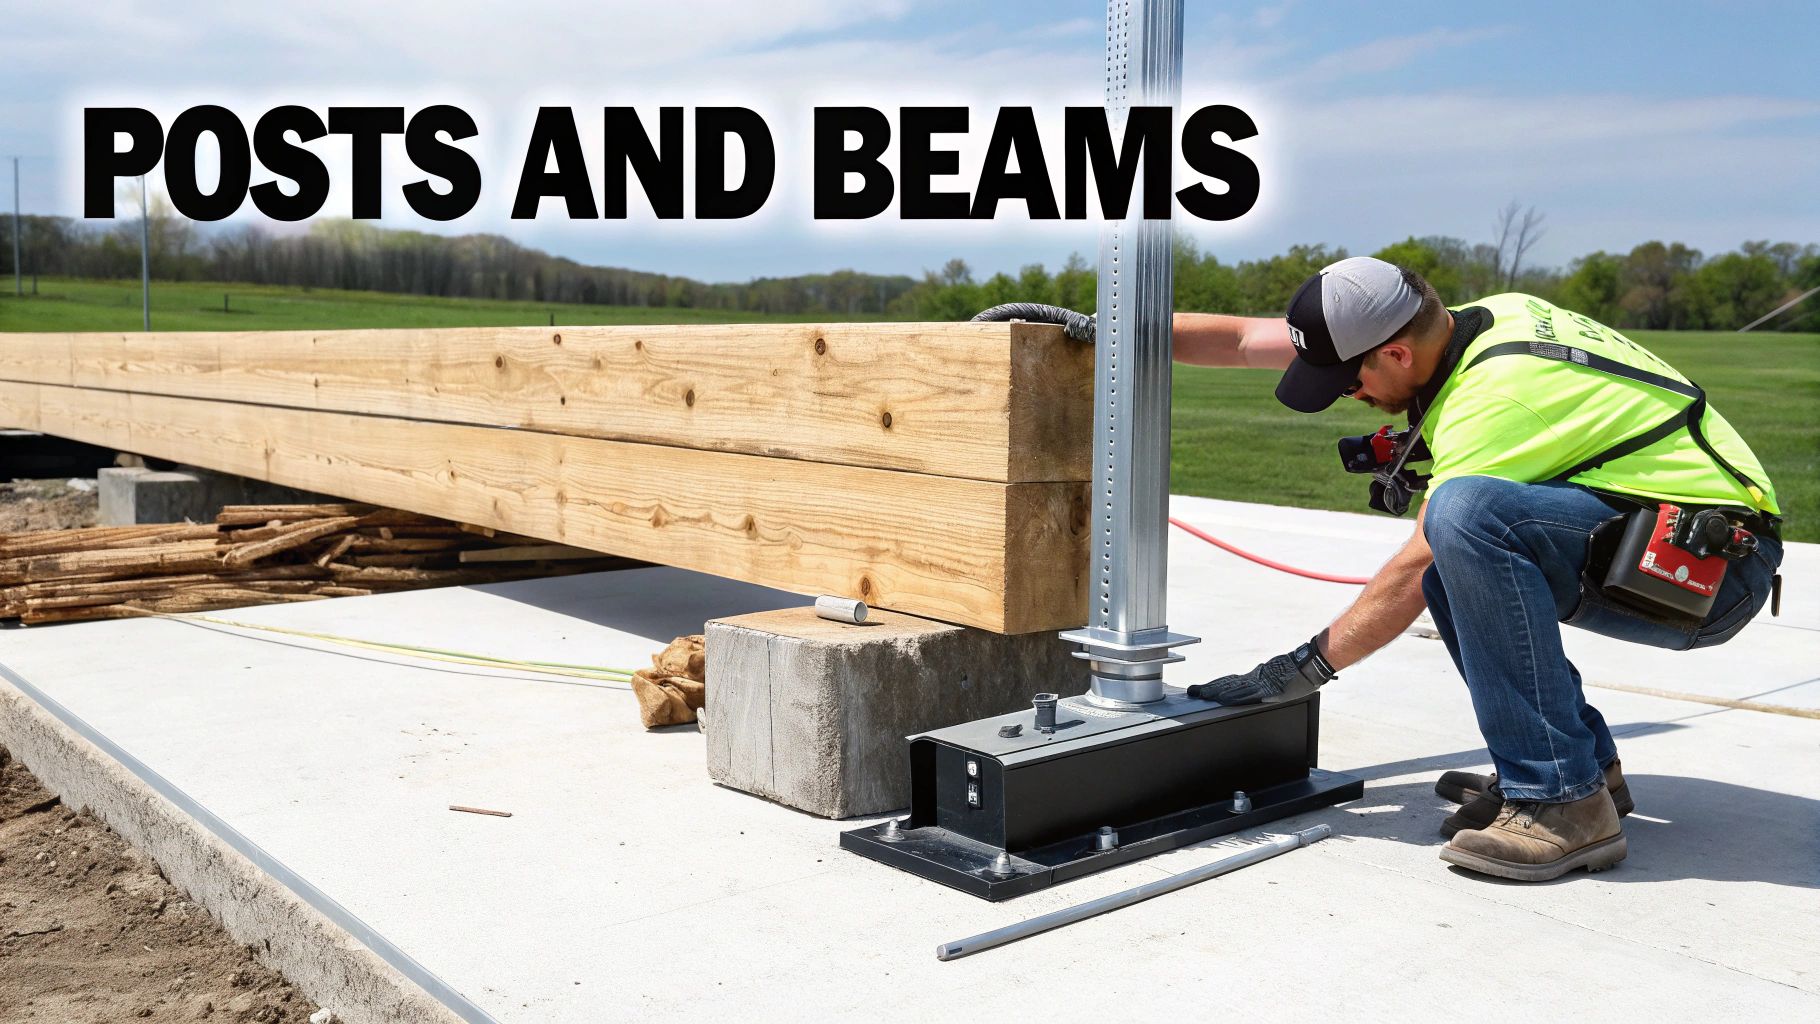
Setting Posts and Beams for a Level Framework
With your footings cured and the post anchors in place, the real fun begins. This is where your deck starts to take shape, rising from the ground as a three-dimensional structure. Getting your posts perfectly vertical and your beams dead level is the absolute bedrock of a good build—everything else depends on it.
First things first, you need to measure and cut your support posts. It’s a rookie mistake to cut them all to the same length. Even slight variations in your footing heights can throw the whole frame out of whack. A much better way is to use a laser level or a simple line level to find the exact height needed for each individual post. This guarantees a perfectly flat plane for your beams to rest on.
Once a post is cut, pop it into its metal base. Now, before you fasten anything, grab your level and check at least two adjacent sides to make sure the post is plumb—that’s builder-speak for perfectly vertical. Brace it with some scrap wood to hold it steady, then lock it down with the proper hardware. Our catalogue is full of the heavy-duty structural screws and lag bolts you need for this job, giving you the shear strength for a rock-solid connection.
Assembling and Installing the Beams
Your beams are the heavy lifters. They’re responsible for carrying the entire load of your deck—joists, decking, furniture, people—and transferring it down through the posts into the footings. Most of the time, beams are built up by sandwiching two or three boards (like 2x8s or 2x10s) together.
When you’re picking out lumber for your beams, sight down the edge of each board. You’ll see a slight arc, or "crown." This is important. You always want to install these boards with the crown facing up. That way, as the deck settles under weight, the beam will flatten out instead of starting to sag.
To build the beam:
- Run a bead of quality construction adhesive between the boards.
- Clamp them together nice and tight.
- Fasten them with a staggered pattern of galvanized nails or structural screws.
With the beam assembled, you’ll need to lift it into place on top of the posts. This is definitely a two-person job, so grab a buddy. Use galvanized post-to-beam connectors to secure it. These purpose-built metal brackets are non-negotiable for a safe, code-compliant deck.
A common shortcut I see is people simply toenailing the beam to the post. Don't do it. This creates a weak connection that just won't hold up against lateral forces or uplift from the wind. Always use the specified metal connectors and fasteners. It’s a connection you need to be able to trust for years.
Finishing Touches for Longevity
Once your posts and beams are firmly in place, there’s one last crucial step to protect all your hard work from the Canadian weather. The exposed end grain on top of a wooden post acts like a sponge, soaking up rainwater and leading to premature rot that can compromise your entire deck.
This is where post caps are a lifesaver. Installing something like a Nuvo Iron post cap is a quick, inexpensive way to seal off that vulnerable end grain and direct water away. They don't just provide critical protection; they also give your deck’s underpinnings a clean, professional look. You can check out our guide on how to choose the right post caps for your deck to find a style that fits your project. It's a small detail that ensures the core support of your deck stays strong for decades.
Framing The Deck With Joists And Ledgers
Once your posts and beams are in place, creating that solid, level foundation, it's time to build the skeleton that will actually hold up your deck boards. This is where the ledger board and the joists come into play. The ledger anchors the whole structure to your house, while the joists form the grid your decking will sit on. Nailing this part of the process is non-negotiable for a deck that lasts.
You could argue the ledger board is the single most critical piece of lumber in the whole project. Since it's the direct link to your home, installing it with absolute precision is the only way to head off major structural failures and prevent water from damaging your house.
Attaching The Ledger Board Securely
First things first: you'll need to cut away the siding where the deck is going. Your ledger board needs to be fastened directly to the rim joist of your house—not the sheathing. Once you’ve exposed that rim joist, the next crucial step is installing proper flashing. This is a waterproof barrier, usually metal or a composite material, that you’ll tuck up under the house wrap and siding, then drape down over the top of the ledger. It's your number one defence against rot.
Never, ever skip the flashing. I’ve seen homeowners get hit with thousands of dollars in repair bills because water worked its way behind a poorly installed ledger and rotted out the home’s rim joist. It's a tiny detail with huge consequences.
With your flashing properly installed, you can position the ledger board and bolt it into place using heavy-duty lag bolts or structural screws. Check your local building code for the required size and spacing for these fasteners, and follow it to the letter. A rock-solid ledger is the very backbone of your deck's support system.
Laying Out And Installing Joists
Now that the ledger is firmly mounted, you can start laying out your floor joists. These are the boards (usually 2x8s or 2x10s) that span from the ledger out to your main support beam, creating the "floor" of the frame. Most building codes call for 16 inches on-centre spacing for joists. However, if you're using certain types of composite decking, the manufacturer might require 12-inch spacing, so always double-check their installation guide.
To attach the joists, you’ll be using joist hangers. These metal connectors are essential for creating a strong, code-compliant connection at both the ledger and the beam ends. At XTREME EDEALS INC., we stock all the joist hangers you'll need for any situation:
- Standard Face-Mount Hangers are the go-to for most typical 90-degree connections.
- Concealed Flange Hangers are a great choice if you're after a cleaner, more finished look, as they hide the fastening flanges.
- Skewed Hangers are what you'll need for any angled corners or uniquely shaped parts of your deck frame.
Using the right hanger with the right nails or structural screws isn't optional—it's what guarantees each joist can handle its share of the load.
The desire for great outdoor living spaces has absolutely exploded, and with it, the demand for building materials that can stand the test of time. Support for decks in California, for example, is a great indicator of this massive home renovation boom. Across the U.S., the number of new single-family homes built with decks climbed from 32,000 in 2010 to 50,000 in 2021. For our clients—the handymen, landscapers, and wholesalers on the front lines—this trend just underscores how vital it is to use top-quality fasteners, carriage bolts, and joist hangers from a supplier you can trust. You can read more about the growth of the composite decking market to see where the industry is headed.
Ensuring Stability With Bracing And Hardware
So, you’ve got the main frame assembled. It probably feels pretty solid, but you might notice a little bit of give or sway if you really push on it. A truly solid support for a deck isn't just about handling vertical weight; it’s about creating a rigid, unshakeable platform that feels like part of the house. This final framing stage is all about the crucial bracing and hardware that lock everything together and get rid of that movement for good.
This is where you turn a sturdy frame into a rock-solid one. The two main ways we do this are by adding diagonal bracing between the posts and beams, and by installing blocking between the joists. Both are surprisingly simple to do but make a world of difference in how stable your deck feels years down the road.
Adding Diagonal Bracing
If your deck is more than a couple of feet off the ground, diagonal bracing is non-negotiable. It's as simple as running a 2×4 or 2×6 at a 45-degree angle from a post up to a beam. This one move creates a rigid triangle—one of the strongest shapes in construction—and it’s incredibly effective at stopping the deck from racking or swaying side-to-side.
You’ll want to fasten these braces with some serious hardware. I always reach for lag bolts or structural screws for this job; they give you the peace of mind that the brace can handle any lateral force thrown at it. For the best results, install bracing in both directions: parallel to the house and perpendicular to it.
The Ultimate Hardware Checklist
The right hardware is the glue that holds your entire deck structure together. One of the most common mistakes I see is builders using undersized or incorrect fasteners, which can seriously compromise the safety and lifespan of the whole project. Here’s a quick list of the essentials you'll find at XTREME EDEALS INC. that you shouldn’t skimp on:
- Stainless Steel Screws: If you're anywhere near the coast or in a particularly humid area, these are a must-have to fight off rust and corrosion.
- Wedge Anchors: These are your best friend when attaching a post base or a ledger board directly into a solid concrete foundation. Their holding power is incredible.
- Galvanized Lag Bolts & Structural Screws: Use these for all the connections that really count—attaching the ledger board, securing bracing, and connecting beams to posts.
- Joist Hangers & Post Bases: As we've covered, these are mandatory for building a deck that’s not only up to code but also structurally sound.
A well-built deck is also a smart financial move. In a competitive market like San Francisco, for instance, a new deck can offer an impressive 83% return on investment. With labour costs rising, DIY builders and pros can significantly cut project expenses by sourcing affordable, high-quality hardware like the post caps, deck screws, and joist hangers we offer. Explore more on California's deck building costs and ROI to see how smart material choices pay off.
This focus on stability doesn't stop with the understructure, either. A secure railing is just as critical for safety. For some great, sturdy design ideas, have a look at our guide on deck railing ideas that will inspire you. Follow this advice, and you’ll have the peace of mind that comes from knowing your deck is built to handle just about anything.
A Few Common Questions About Deck Supports
Even the most detailed blueprint can't account for every question that pops up during a build. I've been there. Getting straight answers is the difference between a deck that lasts a lifetime and one that gives you headaches. Here are a few of the most common questions I hear from builders, both DIY and pro.
What's the Best Wood for Deck Support Posts?
Hands down, you'll be using pressure-treated lumber rated for ground contact. That's the industry standard for a reason.
For smaller, low-to-the-ground decks, a 4×4 post can sometimes do the job. But honestly, I almost always recommend upgrading to a 6×6 post. The jump in strength and stability is massive, giving you peace of mind that's well worth the small extra cost. Of course, always double-check your local building codes—they have the final say.
How Far Can My Joists Span Without Support?
This is a critical one, and the answer is always: it depends. The maximum span for your joists is dictated by two key things: the size of the lumber (like a 2×8 versus a 2×10) and the species of wood you're using.
As a rough guideline, a pressure-treated 2×8 joist spaced 16 inches on-centre can usually span about 10 feet. But you should never just guess. Always look up the official joist span tables for your specific materials. Pushing those limits is a serious safety hazard you don't want to mess with.
Just a bit of hard-won advice: span tables are only half the story. High-quality joist hangers, properly installed at both the ledger board and the main beam, are what allow your joists to safely carry their maximum rated load. This isn't the place to cut corners on hardware—it's absolutely non-negotiable for a strong frame.
Can I Attach My Deck Directly to the House?
Yes, you can, and it's actually the most common way to build a deck. You'll do this using a ledger board, but it has to be done right. This means installing proper flashing to create a waterproof seal, preventing moisture from seeping into your home’s framing.
The ledger itself needs to be anchored with beefy lag bolts or structural screws, driven directly into your house's rim joist.
If that sounds a bit daunting, or you're just not keen on drilling into your house, there's another great option: a freestanding deck. This design stands on its own set of footings and posts, even the ones right up against the house, which means no ledger board is needed at all. It's a fantastic alternative if you want to keep your home's exterior completely separate.
No matter what questions you run into, having the right hardware is always part of the solution. From the toughest structural screws to protective post caps, XTREME EDEALS INC. has the high-quality components you need to build with confidence. Find all your essential deck support hardware at https://www.xtremeedeals.ca.

